For Best Storage
Storing your stock properly will be key! In the fridge it lasts up to 7 days so it is best to purchase freezer safe storage containers to keep you stock on hand. I recommend purchasing a dozen or more Wide Mouthed Freezer Safe Mason Jars. These will allow you to have stock on hand within minutes because the wide opening allows the stock to slide straight out after running the bottom of the jar under hot tap water for a few minutes to loosen it up. This can be added directly to the cook pot for use. If you freeze in other glass jars, the stock will not slide out and you will have to wait for it to defrost. Other glass jars are not freezer safe and you can easily destroy an entire batch with glass cracking in the freezer or from the change in temperature when running them under hot water to loosen them. These jars are supplied at our Online GAPS Shop
Fish Stock Selections & Preparation
Fish frames with fish heads intact, including skin and fins (no fish meat required).
The fish flesh contained in the heads of the fish will produce the necessary gelatin and essential minerals for this recipe. If you use the whole fish including the fish flesh to make the stock, the fish will fall apart and begin to disintegrate into the stock, clouding the stock and making it messy. The meat is better saved for an enjoyable meal separately. And of course this is very resourceful, sustainable and satisfying to get use out of every part of the animal you’re eating.
If you are aiming to make a tasty fish stock, select bones from white fish such as bass, cod and flat fish. Bones from oily fish such as salmon, mackerel or tuna are very fatty (which is ideal for GAPS) but they can impart a greasy and unpleasant taste for people who are getting used to fish stock. Having said this, fatty fish are preferred sources for the GAPS diet.
The fish bones must be cleaned of any blood and gills as these will impart a nasty, bitter taste and cloud up your stock. Fish heads add a lot of flavour and contain a lot of gelatine which will give body to your stock, but make sure they are thoroughly cleaned (and always remove the gills). A good way of cleaning the bones is to run them under a cold tap and leave them to soak in the water to allow impurities to float the surface (which you can then skim and discard).
Hints & Facts:
- Add 1/4 a cup of apple cider vinegar to help draw out minerals from the bones and into the stock such as calcium potassium and magnesium. Some people may not be ready to add this during intro.
- If you choose fatty fish like mackerel or salmon, make sure they are not farmed or preserved in any way.
- Gelatin is the substance extracted by boiling bones, fins and heads.
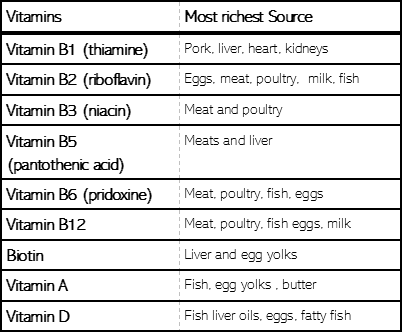
Contrary to popular belief meat, fish and organ meats like liver and kidney have the highest contents of vitamins, amino acids nourishing fats, many minerals and other nutrients which we need in order to be adequately nourished.
Clinical Notes:
Low fibre is the aim initially (especially for people who have profuse watery diarhoea), however if you are more prone to constipation, you can add onion, celery and cabbage to the stock for more flavour.
https://shop.gapsaustralia.com.au/freezer-safe-mason-stock-storage-jar-475ml/

")
")
")
")