Pork Meat Stock
It is important to understand the difference between meat and bone broth. Meat stock and bone broth are two different things. Simply put, meat stock is made over a few hours with raw bones and meat, where as bone broth is made with old cooked bones and cooked over 12 – 24 hours or more. […]

| Prep Time | 30 Minutes |
| Cook Time | 3-6 Hours |
| Passive Time | 30 Minutes |
| Servings |
4 litre pot
|
- 4 Litres Filtered water
- 2 Tbs Celtic or Himalayan Sea Salt
- 1/4 Cup Apple Cider Vinegar Optional: helps to soften bones and extract some marrow
- 3 Onions Cut into halves or quaters
- 3 Cut Carrots Roughly chopped
- 3 Diced Celery sticks Avoid adding this if you are following the intro stages: this can be added to this recipe on full GAPS
- 6 Cloves Raw Garlic Crushed
- 2-3 Sprigs Fresh Oregano Alternate with thyme, parsley or rosemary
- 1 Tsp Black Peper Corns Optional
- 1 Tbsp Lard or ghee
- 2-4 Meaty pork rib bones Number selected for these are dependant on what is available
- 4-6 Pork neck bones Number selected for these are dependant on what is available
- 1-2 Pork shoulder joint cuts Number selected for these are dependant on what is available
- 4-6 Pork marrow bones Number selected for these are dependant on what is available
- 2-4 Pigs trotters Highly recommended: This helps make the stock more gelatinous
Ingredients
Basic Ingredients
Pork Meat Joints: Your meat joint must contain bones with marrow, soft tissue and bones with meat still attached to it - Select at least 3-4 items from this group below
|
|
- Your selected meat joint must contain bones with marrow, soft tissue and bones with meat still attached to it. Ask your butcher to cut some large tubular marrow bones so that the marrow can be easily accessed like that shown in the image.

- Lightly brown the meat cuts in lard or ghee in a frypan or . This creates added flavour to the stock. Do not cook it, just lightly sear it with a sprinkle of salt to create flavour.
- Place the bones and meat joints into a large pot and fill it up with 4 litres of filtered water.

- Cut the onions into halves or quarters and add them to the pot along with roughly chopped carrots and crushed garlic cloves. If you are following the introduction diet stages, we recommend you avoid the fibrous vegetables such as celery at this time.
- Add salt to taste at the beginning of cooking and about a teaspoon of black peppercorns.
- Add apple cider vinegar and fresh oregano.
- Bring to a boil and skim and skim off any scum that rises to the top. Then reduce the heat and leave on the stove at a low simmer for about 3–6 hours. If you are cooking in the oven, cook at 150°C for 3 hours. If using crock pot, cook on high for 2 hours, then on low for 6 -8 hours. This is the measured cooking time frame to make your nutrient meat stock. Bone stock without the meat cuts are usually longer. The longer you cook the bone stock the more nutrients and the softer the bones become for fishing out marrow.
- After cooking for the recommended time above, remove the meat, marrow and bones by straining the stock ingredients through a sieve. You can do this by collecting the stock under the strainer into a larger pot. Strip off all the meat and soft tissues from the bones as best as you can and extract the bone marrow out of the large tubular bones while they are still warm: to do that bang the bone on a thick wooden chopping board. The gelatinous soft tissues around the bones and the bone marrow provide some of the best healing remedies for the gut lining and these should be put aside with the meat that has been stripped from the bones to add later to soups or as a meal. It is also ok for the patient to eat the marrow and soft tissue direct from the bones.
- Strain the remaining stock with a cheesecloth to remove all remaining small bones, pepper corns and any vegetables that were added. Discard any tiny bones and vegetables added. Store the stock in wide mouthed freezer safe mason jars in the fridge or freezer. The meat stock will keep well in the fridge for at least 7 days or it can be frozen. The bones can be frozen and later used again to make bone broth.
If you wish to make bone broth/stock later, you can keep the bones by storing them in the freezer and cook the ingredients for longer to extract more nutrients from the bones. Refer to our Bone Broth Recipe to make this but remember not to introduce bone broth until you are on Full GAPS Diet or simply continue with the nutritious meat and gelatin stocks.
For Best Storage
Storing your stock properly will be key! In the fridge it lasts up to 7 days so it is best to purchase freezer safe storage containers to keep you stock on hand. I recommend purchasing a dozen or more Wide Mouthed Freezer Safe Mason Jars. These will allow you to have stock on hand within minutes because the wide opening allows the stock to slide straight out after running the bottom of the jar under hot tap water for a few minutes to loosen it up. This can be added directly to the cook pot for use. If you freeze in other glass jars, the stock will not slide out and you will have to wait for it to defrost. Other glass jars are not freezer safe and you can easily destroy an entire batch with glass cracking in the freezer or from the change in temperature when running them under hot water to loosen them. These jars are supplied at our Online GAPS Shop
Butcher supplies for meat stock
The ratio of ingredients is individual and dependant on the size of the batch you wish to make but keep in mind that some stock should be reserved for drinking and some for making your batch for soup. The remainder of your ingredients will depend on what type of meat stock you are making. Here is a list of bone selections you can ask for at your organic butcher shop.
Beef, Lamb, Pork or Game Selections
- Large tubular marrow bones
- Gelatinous meats
- Meaty rib bones
- Osso Buco cuts
- Knuckle bones
- Shanks
- Neck bones
- Tail bones
- Trotters
- Joints
- Ears
Poultry Selections
- Whole chicken & extra chicken frames
- Feet from one chicken
- Gizards & giblets
- Spatchcock
- Pheasants
- Pigeon
- Goose
- Duck
Fish Selections
- Fish frames with heads (no fish meat)
- Skins
- Fins
Hints & Facts:
- Add 1/4 a cup of apple cider vinegar to help draw out minerals from the bones and into the stock such as calcium potassium and magnesium. Some people may not be ready to add this during intro.
- Choose fatty fish like mackerel or salmon. But make sure they are not farmed or preserved in any way.
- Gelatine as the substance extracted by boiling bones, hoofs, trotters and soft animal tissues from gelatinous meats.
- The celery sticks should be avoided for patients in the introductions diet stages. These can be added later on full gaps for added stock flavour. They can be freshly cut as shown in the instructions or sauteed in a pan with onion and garlic prior to adding to the pot for added flavour.
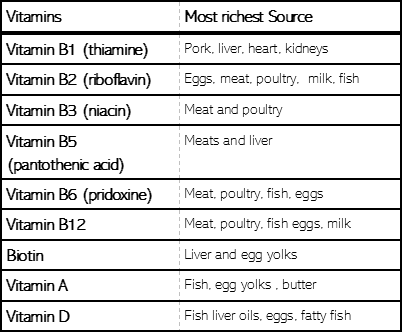
Contrary to popular belief meat, fish and organ meats like liver and kidney have the highest contents of vitamins, amino acids nourishing fats, many minerals and other nutrients which we need in order to be adequately nourished.
Charting the highest source of essential nutrients
Clinical Notes:
Low fibre is the aim initially (especially for people who have profuse watery diarhoea), however if you are more prone to constipation, you can add onion, celery and cabbage to the stock for more flavour.


")


")
")
")

")


