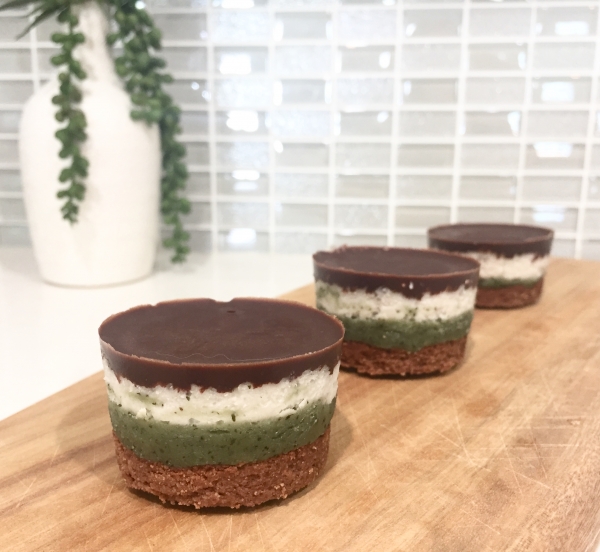
Choc Top Minty Moments – Cheesecake Medallions

This recipe is an absolute delight if you love chocolate and mint with a splash of coconut cream flavour on a delicious crumbly biscuit bottom.  If you don’t like mint, simply leave that out of the recipe.  Although this recipe is not difficult, it does take some time to prepare but the time taken is […]
Print Recipe
Choc Top Minty Moments Cheesecake Medallions
This recipe is appropriate for people who are following the Full GAPS Diet.
Votes: 1
Rating: 5
You:
Rate this recipe!
Prep Time 1 Hour
Passive Time 40 Minutes
Servings
Cups
Prep Time 1 Hour
Passive Time 40 Minutes
Servings
Cups
Votes: 1
Rating: 5
You:
Rate this recipe!
Instructions
Biscuit Bottom
  1. Pre-heat oven to 150 degrees Celsius for 10 minutes (no hotter)
  2. Mix all ingredients in a bowl with a spoon, followed by massaging all the contents and squeezing the ingredients in your hands where you can feel the mixture starting to stick together. Depending on the consistency of the mixture, add more nut butter or coconut oil if it is too dry or more nut flour if it is too moist. You want to create a cookie dough so keep mixing and squeezing the contents with your hands so that the mixture can form a big ball ready for making smaller balls.
  3. When you have rolled the cookie mixture into a ball on the bench top, pinch a section of the dough and roll the section into a ball approximately 4cm in width. Continue this until you have 20 balls ready.
  4. Place each ball into mini round cardboard baking cups. These will be used as the mold for the entire cheesecake and they should be 5cm wide measured from the bottom.
  5. Press the first layer with your thumb by pushing the ball down flat to make a base in the bottom of the cup ensureing it reaches all the sides with good coverage.
  6. Place the baking cups onto a baking tray and place the tray in the preheated oven at no more than 150 degrees Celsius for 10 minutes, keeping a close eye on them to ensure they do not burn. Almond flour burns easily so do not cook any higher than 150 degrees Celsius.
  7. Remove the tray from the oven after 10 minutes and let the cookies cool for 5 minutes and then place them in the fridge for 15 minutes to cool whilst you prepare the next layer.
Mint Cheescake Layer
  1. Soak cashews in water for 20 minutes and then rince them and drain off the water.
  2. Add Cashews to the thermomix or strong mixer and mix on a high speed to break down the nuts into a flour like consistency.
  3. Add coconut oil and coconut milk to the mixture and continue to blend whilst occasionally stopping to wipe down the sides with the spatula to ensure all the ingredients are blended together evenly.
  4. Add honey, vanilla essence, mint flavour and mint leaves. The mint leaves are optional because they do require a lot of blending and pulsing to break them down into a paste along with the nut and coconut mixture. They do contribute slightly to the flavour and add some colour.
  5. If you wish to add more colour, add the spirulina powder.
  6. Continue to mix and blend whilst occasionally stopping to wipe down the sides with the spatula to ensure all the ingredients are blended together evenly. Keep blending until you establish a nice creamy like texture.
  7. Remove the baking cups from the fridge and add a spoonful of the mixture until all the ingredients is evenly dispersed in each cup.
  8. With the back of a teaspoon, level out the mint layer so that it is reasonably flat and place the cups in the freezer for 15 minutes.
Coconut Cream Layer
  1. Mix all coconut meat ingredients in a saucepan on medium heat until all ingredients is well combined and melted
  2. Remove from stove and mix ingredients in a food processor to grind the desiccated coconut a little finer.
  3. Add a spoonful of the mixture
  4. With the back of a teaspoon, level out the mint layer so that it is reasonably flat and place the cups in the freezer for 15 minutes.
Chocolate Top
  1. Simmer some water on a low heat in a saucepan and place a glass bowl over the simmering water. I like to use a pyrex jug (size measures 4 cups) for this as it works nicely to pour the ingredients later.
  2. Add the cacao butter to the glass bowl and melt the cacao butter completely. (CAUTION: Keep the heat at a low temperature so that the steam does not cause any water residue within the glass bowl and make sure all your utensils and materials do not have any water on them because any water contaminating the mixture will cause lumps and clumps and spoil the smooth chocolate result).
  3. Once melted, turn off the heat and add the cocao powder gradually whilst stirring continuously with a bone dry whisk until mixed well with no lumps. Add honey and vanilla essence and continue to whisk.
  4. Remove the baking cups from the freezer and pour chocolate mixture over the top until all the ingredients is evenly dispersed in each cup to provide good coverage as the top layer. Try not to make the top layer too thick to make it easier to bite into the cheesecake.
  5. Refrigerate for 1hour to set.
  6. When all ingredients have set, you can tear the cardboard paper cups and slowly remove the cheesecake medallions from the cup casing to expose them for serving. I recommend you keep them in the baking cups until you are ready to serve or eat.

Coconut Milk Yoghurt

This recipe is a good alternative for people following the GAPS Diet who are unable to tolerate dairy or who have an anaphylaxis reaction which is a true allergy. Dr Natasha Campbell-McBride does not encourage individuals to avoid GAPS fermented dairy unless there is a true food allergy, and this can be determined by doing […]

Print Recipe
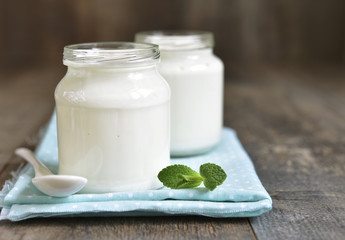
Coconut Milk Yoghurt
Making your own coconut yoghurt is simple and cost effective. You can choose how probiotic you want your yoghurt to be by extending the fermentation length time and by what culture source you use. We recommend you select a starter culture with a good selection of beneficial probiotic strains. You can even use kefir grains to make kefir instead of yoghurt with this recipe. GAPS Diet Australia have a good selection in their shop, however if you have a good strong multi strain probiotic of your own, you may also use that for your starter.
Votes: 1
Rating: 5
You:
Rate this recipe!
Prep Time 30 minutes
Cook Time 7-9 hours
Servings
Litre
Ingredients
Mixture Ingredients
  • 1 Litre Full fat coconut milk (see our coconut milk recipe) Avoid BPA cans & petra-paks containing added water
  • Yoghurt starter culture OPTIONS • Dairy free cultured yoghurt starter powder (measure as per product instructions) OR • Two Dairy free probiotic capsules per litre of milk OR • 1/3 cup of coconut yoghurt as a starter per litre of milk • Kefir
  • 1-2 Tbs Raw honey Generally not required for incubation depending on milk source. See notes below
  • 2 Tbs organic gelatin powder Optional: depending on viscosity preference
Optional ingredients for sweetening
  • 1-2 Tsp Raw honey Optional: To be added after fermentation & refrigeration to taste
Equipment
Votes: 1
Rating: 5
You:
Rate this recipe!
Instructions
  1. Sterilize all equipment in hot water (80˚C) for 1 minute. If you are sterilizing glass jars, do not drop them in boiling water over 80 ˚C or you may risk cracking or breaking them. You may risk contamination with bad bacteria if all the equipment is not first sterilized.
  2. In a saucepan, bring coconut milk to 80 degrees C, then remove from heat. Do not boil the milk over 90 degrees Celsius; this will spoil the flavour. Your coconut milk must reach 80-90 degrees Celsius or you risk contamination with bad bacteria. Raw coconut milk can be made without heating, however this needs to be done with fresh naturally retrieved coconut milk that is less likely to be contaminated.
  3. In some cases you may need to add honey. Honey is not usually added to coconut milk because it does contain it’s own sweetness to feed the culture during the fermentation process, however some milk sources may require it so you may need to experiment with this in whether to add the honey or not. Sweetness provides food for the bacterial culture and your yogurt will often not ferment well without it if it is not sweet enough on it’s own.
  4. Cover and cool the milk until it reaches a temperature between 38-45 degrees Celsius. Do not add the starter culture until it has cooled down or it will kill the good bacterial culture you are about to introduce.
  5. Pour aproximately1/2 cup of cooled coconut milk from your mixture into a sterilized glass, and mix in your starter culture or probiotic. Stir well until all is dissolved.
  6. Return the stirred ½ cup mixture to the existing cooled milk and mix well with a whisk or spoon.
  7. Pour cultured milk into your sterile yogurt maker jars, or any sterile glass or enamel containers that work for you and place the jar in the yoghurt maker.
  8. Set the timer for the desired incubation period and ferment the yoghurt for 7 – 9 hours at a temperature range between 38˚C and 45˚C. The Wholesome ‘me’ yoghurt maker will ferment up to 36 hours if you wish to ferment longer and produce a strong probiotic and very tart yoghurt flavour.
  9. When the fermentation is complete, transfer the yoghurt to the fridge to set for 6 hours before consuming. Refrigeration for this time allows the yoghurt to set.
  10. If your yogurt separates after chilling (which is common), either stir it briskly with a spoon, or whip it with a stick blender.
  11. If you wish to have thicker yoghurt strain the yoghurt and drip all the liquid whey out of your yogurt using a cheesecloth. Drip the yoghurt whey for 6 – 12 hours through a cheesecloth. The whey is probiotic and can be used to add to soups (when cooled before eating) for added probiotic nourishment.
  12. Add honey or fruit to taste.
Recipe Notes

Troubleshooting

Your yoghurt should smell and taste sour like yogurt. If you notice a bad odor, mold, or hints of grey or pink on the surface, we suggest that it has been contaminated with bad bacteria overgrowth and advise to throw it out and try again. This can be caused by a number of things:

  • The equipment was not thoroughly sterilized
  • The milk source was contaminated (was it canned or other?)
  • The milk source in a tetra-pak contained too much water and very little fat
  • The starter culture died from temps too high or too low
  • The starter culture is not right for the type of milk used the starter culture did not have enough natural sugar content to feed of in the milk source
  • The starter culture is out of date or not active
  • The correct amount of starter wasn’t used
  • Other foreign “bad” bacteria colonized the batch.

Unlike nut milks, most coconut milk sources do not require added honey during the incubation period to feed the fermentation process as the coconut milk usually has it’s own sweetness.  However, we can’t control what milk source you choose to use so adding honey during the preparation before the incubation period will be something you may need to experiment with on your own.

Coconut yogurt produces a thinner and runnier yoghurt viscosity compared to cow’s full cream milk yogurt, but there are two ways to thicken it: Add a dissolved thickener like natural gelatin to your milk before fermentation, OR after fermentation, strain the yoghurt and drip all the liquid whey out of your yogurt using a cheesecloth.

Once fully cooled, your yogurt may separate again, with some of the coconut oil hardening on top and a clear or cloudy liquid on the bottom. This happens especially with homemade coconut milk which hasn’t been homogenized and emulsified with factory machinery. This is usually not a problem, as long as everything else smells and tastes right. Just mix well with a spoon or stick blender, and enjoy.

Some new tetra-paks of coconut milk are not appropriate for making yogurt because they are mostly water and very little fat. Choose a high-fat natural coconut milk or cream made for cooking.

Use the same ingredients to make kefir by switching the dairy starter or probiotics with kefir grains and follow the kefir recipe instructions.  This is best made in one large container though (not individual jars).