Raw Dairy Milk Yoghurt – Creme Fraiche & Whey
This recipe is primarily a yoghurt recipe, however we will continue with a second set of instructions to produce some whey which should be introduced first on the introduction diet. Using the same instructions here to make yoghurt, you can also make what Dr Natasha refers to as Creme Fraiche (sour Cream) This is in- fact far more nutritious because it contains higher good fats that GAPS Patients require.
Raw dairy milk yoghurt for GAPS is usually made from cow or goats milk. The GAPS protocol promotes raw milk because it contains it’s own beneficial bacteria and important digestive enzymes that help to digest the proteins within the milk in order for us to be able to absorb the calcium and nutrients. Pasturised milk destroys these important enzymes through heating so the milk becomes neutralised. It is important to find a trusted raw milk supplier that looks after their cows well so that you know you are getting a good quality supply of milk.
Most people are also unaware of the Australian and New Zealand Food Standards Code which permits the milk industry to bleach their end mass production product to hide any impurities and discoloration caused by infections from potentially unwell cows. Another reason to source a good farmer with healthy cows.
If you are unable to find raw milk, be sure to select organic full cream milk from grass fed cows. This will still provide you with benefits because the long fermentation process will allow for the production of more beneficial bacteria that would have been lost during pasturisation.
In this recipe, raw milk does not need to be heated before placing it into the yoghurt maker for fermentation. When yoghurt has been made on raw milk or cream however, it will produce a different result to commercial yoghurt that is made on pasturised milk and it will appear to retain more liquid (whey) with unpredictable lumps. Most people are used to the smooth textured thick yoghurt viscosity and if this is the result you prefer, then you should heat the raw milk close to boiling point first but remember, this process will kill some of the beneficial digesting enzymes within the milk. Gentle heating at home is not as drastic as commercial pasteurisation practices and the long fermentation process will restore a good deal of its vital nutrients (please refer to the instructions on how to heat the milk below the recipe).
Preparation
Sterilize your glass fermenting jars and lids in hot water (80˚C) for 1 minute. This will ensure they are free from other living bacteria. Make sure you source a good yoghurt maker that has the capacity to ferment as long as 24 hours. Many yoghurt makers on the market do not ferment for this length of time and they also do not maintain the correct temperature throughout the entire fermetnation process. Yoghurt makers at GAPS Diet Australia meet this fermenting requirement for GAPS
You will need the following equipment to make your yoghurt
• Saucepan, large pyrex jug and whisk
• 24hr fermenting capacity Yoghurt Maker
• Thermometer (if you are heating milk)
You may also need the following for making whey
What kind of milk should I use?
Goats milk has been reported to be easier to digest than cows milk and preferred by GAPS people, however, both goat and cow milk are appropriate for GAPS. According to an article on making baby formula at the Weston A Price Foundation, an important note has been made regarding goats milk for infants and young children. Advising ‘although goat milk is rich in fat, it is very important to consider it’s lack of folic acid and low content in vitamin B12, both of which are essential to the growth and development of the infant or young child’. If you choose goats milk you may compensate for low levels of vitamin B12, by consuming more organic raw or cooked chicken liver.
What kind of starter culture do I use?
• Powdered yoghurt starter, synbiotic powder or commercial yoghurt as a starter. You may purchase yoghurt starter and synbiotic powder at gapsdietaustralia.com.au
I prefer to use the GutBiome Synbiotic Powder to make yoghurt as it produces a stronger probiotic yoghurt with a good thick viscosity.
Introducing Dairy
The GAPS ‘dairy introduction structure‘ promotes introducing whey first followed by yoghurt and then Kefir. When introducing any of these, we do it methodically by first conducting the ‘food sensitivity test’ first, followed by adding small amounts at a time added to other food to ensure they are well tolerated. This approach is used because probitic foods can produce a die off reaction, especially for people who have food sensitivities or a damaged gutbiome. Refer to the recipe miscellaneous section to understand more.

| Cook Time | 24 - 30 Hours |
| Servings |
|
- 1 Litre Raw Milk (Cow or goats milk) or Raw Cream
- Yoghurt starter culture (see options below)
- 1 Yoghurt Maker I suggest the 'Wholesome me’ Yoghurt Maker as it is specifically designed for GAPS
- 1 Milk thermometer If making yoghurt with pasturised milk
- 1 Saucepan Only required for heating if you are not making raw yoghurt
- 1 2 Litre Pyrex Jug For mixing the starter and pouring into jars
Ingredients
Ingredients
Equipment
|
|
- Steralise all your equipment such as the pyrex jug, whisk and yoghurt making jars/container.
- Pour your milk in a large jug. I like to use a two litre sized pyrex jug.
- Add your yoghurt culture starter option to the milk. Please refer to the yoghurt culture starter options listed above. If you are using a powdered culture or synbiotic powder, be sure to first stir the powder into 15mls of milk in a separate sterilised cup first to ensure that the starter does not clump and then add this to the remaining milk and stir well. It is important to stir the starter well so that it blends and mixes with all the milk to produce a good yoghurt. You can do this slowly and gradually with a whisk. (If you are not making raw yoghurt and you have heated the milk first, make sure that it cools down to a temperature between 38˚C and 45˚C before adding the culture).
- After the starter culture has been added and mixed well to the milk, it is ready to pour into the yoghurt maker jars or glass dish. When this is done place them into the yoghurt maker.

- Set the timer for the desired incubation period and ferment the yoghurt for 24 hours (minimum) or more at a temperature range between 38˚C and 45˚C. 24 hour fermentation will allow the yoghurt to be virtually lactose and casein free and make proteins more digestible). The longer the ferment, the stronger and more tart the taste will become but the more beneficial it will be.
- When the fermentation is complete, transfer the yoghurt to the fridge to set for 6 hours before consuming.
- GAPS Yoghurt will produce a lovely creamy layer on top. This is easily mixed into the yoghurt or you can scoop it off and enjoy it as is.

- Fruit and honey are good natural sweetener options to add flavour. *Be sure not to add any fruit to the yoghurt before fermentation as this may allow mould or harmful bacteria to proliferate.
- Keeps for several weeks in the fridge
- Raw yogurt will not naturally become as thick as traditional yogurt and may present with some whey. If you would like your yogurt to be thicker, try dripping it through a cheesecloth for a few hours to remove some of the whey (see below instructions). Store the whey in the fridge and use for culturing or adding to dishes as per the introduction diet.
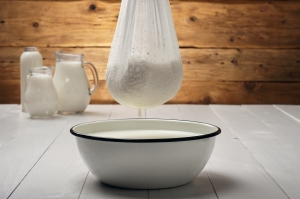
- With a large (bleach free) cheese cloth, line a stainless steel colander. Sometimes you will need to double or triple lay the cheese cloth for desired result. This means folding it over a couple of times to make it less pour’s which will slow down the dripping process and collect more cream cheese.

- Place the colander over a large glass bowl and pour your yoghurt into the cheesecloth lining the colander. This will allow the whey to drip through the cheese cloth and collect in the glass bowl underneath. Alternatively you can hang the cheesecloth from a kitchen cupboard handle and let it drip into a glass bowl underneath it.
- Cover the colander with a tea towel and leave it for a few hours. The result will establish a liquid in the glass bowl (whey) and remaining residue in the lined colander will resemble cottage cheese.
- Pour the whey into a clean glass jar with a tight lid to use with the GAPS introduction stages and keep it in the refrigerator. The whey can also be used as a starter for fermenting different foods, such as vegetables, fish, seeds and nuts (when your patient is ready to have them). Depending on how long you leave your yoghurt dripping, you can make cottage cheese or use these steps to make a thicker yoghurt. Both the yoghurt and the cheese can be used for baking, adding to salads and soups and as deserts with honey and fruit.
If you can not find raw milk
If you are unable to find raw milk, be sure to select organic full cream milk from grass fed cows and follow these steps at the beginning of the recipe.
1. Pour milk into a large saucepan and very slowly bring the pasturised milk close to boiling (approximately 80-90°C) in a stainless steel saucepan & stir occasionally. (Try not to boil too fast as it may burn) By bringing the milk close to boiling point (no higher than 80°C) you destroy any bacteria which may be lingering in the milk that can interfere with the fermentation process. It is important not to boil the milk as it will change its taste. (Boiling point is set at 100°C).
2.Take the saucepan off the stove and set aside to cool down. You can cool it down faster by filling your sink with cold water and ice and submerging the base of the saucepan in the cold water. Keep an eye on the thermometer until it reaches between 38-45°C.
3. After the milk has cooled to 38-45°C, you may add your yoghurt starter. If you are using a powdered culture or synbiotic starter, be sure to first stir the powder into 15mls of milk in a separate sterilised cup to ensure that the starter does not clump and then add it to the remaining milk and stir well. It is important to stir the starter well so that it blends and mixes with the all the milk. You can do this slowly and gradually with a whisk. IMPORTANT: Make sure you add the yoghurt or starter after it has cooled down between 38 – 45˚C and not any hotter or it will kill the beneficial bacteria. When the culture is mixed well, pour the milk into a glass pyrex jug because the spout on the jug will make easier to pour into the yoghurt making jars.
Continue with the remaining cooking instructions from this recipe from step 4 onward.
IMPORTANT: Make sure you add the yoghurt or starter after it has cooled down between 38 – 45˚C and not any hotter or it will kill the beneficial bacteria.
If you can't use Dairy
If you have a true dairy allergy, you may make yoghurt with nut milk or coconut milk. Please refer to our recipes on how to make these.
What yoghurt maker is best?
The Wholesome me yoghurt maker was specifically designed for GAPS
